DIY simulator bay
Golf Simulator Impact Screen Frame Size Guide: Get the Dimensions Right Before You Build
Most golfers obsess over which impact screen to buy. Almost nobody thinks hard enough about the frame — until their brand-new screen is sagging in the middle, tearing at the grommets, or bouncing balls straight back at them. One sizing mistake can void your screen warranty, wreck your projection surface, and cost you hundreds in materials to redo.
The golf simulator market hit roughly $2 billion in 2024 and is growing at 7–9% annually. (Source: Polaris Market Research / Straits Research) That means more DIY builders are attempting frame builds than ever — most without a clear sizing guide. This is that guide.
Start With the Screen Size, Not the Room
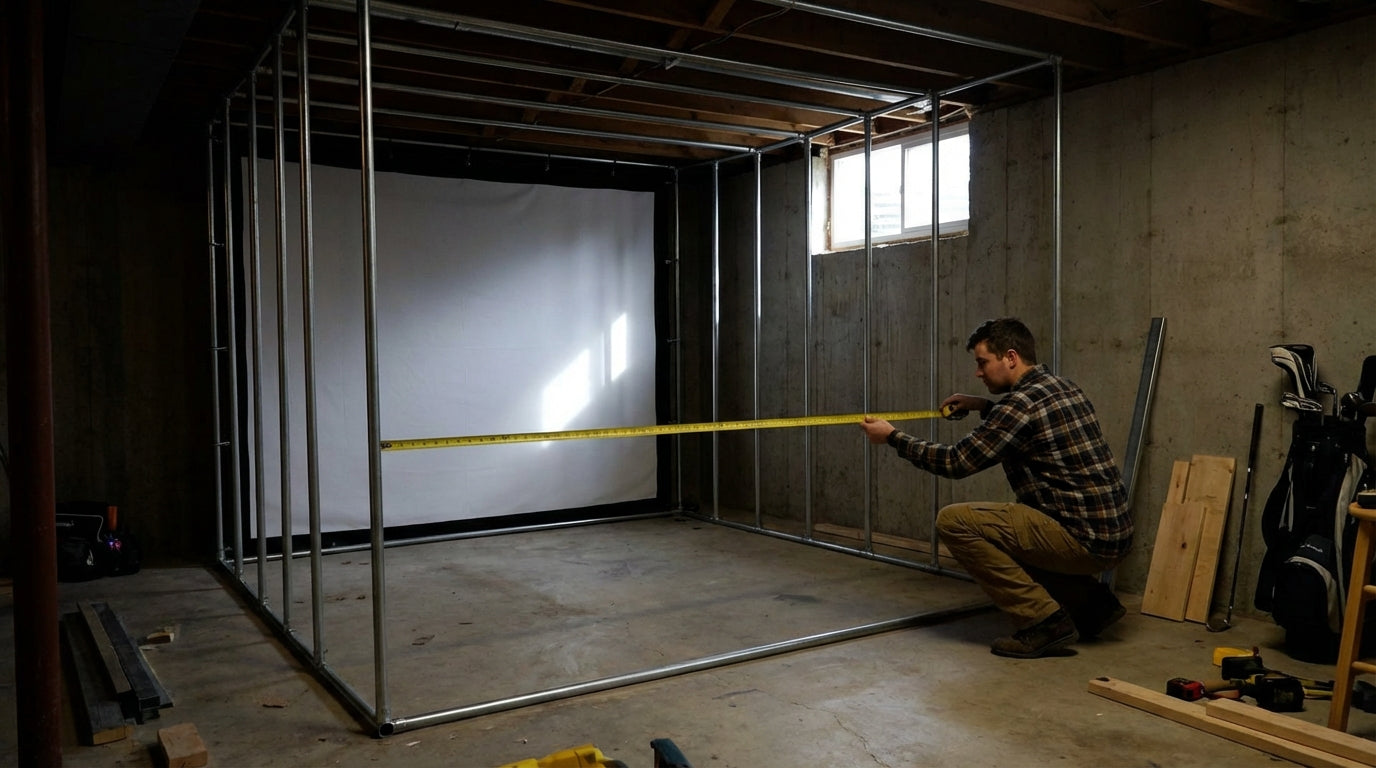
The most common mistake: builders measure the room, pick a frame size, then try to find a screen that fits. Do it backwards.
Pick your screen size first based on your room dimensions (check out our no-nonsense screen sizing guide if you haven't done that step yet), then size your frame around the screen.
Here's the rule: build your frame approximately 2 inches larger per side than your screen. A 144"×108" screen needs a 148"×112" frame — not the same size, not 1" bigger. Two inches per side. (Source: My Golf Simulator / Shop Indoor Golf)
That gap lets you attach the screen under proper tension without stretching it drum-tight at the grommets. Undersized frames stress the fabric at the connection points — which is exactly where screens fail first. Even 1" too small forces the screen into an unnatural stretch that accelerates wear at every attachment point.
Height Rules — Your Ceiling Will Constrain You
Ceiling height is the #1 obstacle golfers face when setting up a simulator enclosure. (Source: Rain or Shine Golf / Trackman / Indoor Golf Design) Here's how the numbers stack up:
- Minimum 9 feet of ceiling height to swing all clubs comfortably
- 10 feet recommended for a full driver swing with room to spare
- Your frame's top rail adds 1.5–2" on top of screen height
So if you want a 108"-tall screen and plan to swing a driver: 108" of screen + 2" frame overhang + 2" top rail = roughly 9'4" just for the frame structure. Then you still need swing clearance above that. Run the math before you cut anything.
Don't Forget the Floor
If you're laying rubber flooring or a turf mat first — common in basement setups — subtract that thickness from usable ceiling height before finalizing frame height. A 3/4" rubber tile sounds trivial until you're mid-backswing with a driver and realize you've got nowhere to go. More on the full ceiling picture in our ceiling height requirements guide.
Depth Clearance — The Number Most Builders Ignore
Your screen needs room behind it to flex on impact. Minimum 12 inches. Sixteen or more is ideal. (Source: Canvas ETC / Golf Simulator Forum DIY build guide)
Builders who mount screens with less than 12 inches of rear clearance run into two problems:
- Screen wear: Contact with the back wall on every shot accelerates fabric degradation dramatically — you're essentially hitting a screen that's braced against a solid surface instead of absorbing impact through flex
- Ball bounce-back: Without flex room, kinetic energy transfers back toward the golfer instead of being absorbed by the screen and the air gap behind it
Sixteen inches isn't a luxury. It's a safety margin. If your space is tight, consider moving the entire frame forward rather than mounting it flush to the back wall.
Frame Material Sets Your Maximum Span Width
Not all materials can handle the same widths without sagging. PVC pipe — the cheapest and most popular beginner choice — sags significantly on horizontal spans exceeding 6–8 feet. (Source: Canvas ETC DIY Golf Impact Screen & Enclosure Guide)
A sagging top rail creates a droop in the center of your screen that ruins your flat projection surface. Worse, it creates a loose-fabric situation where balls can deflect unpredictably off the slack section instead of absorbing cleanly.
For screens wider than 8 feet, use EMT conduit or 2×4 lumber. A complete DIY EMT conduit frame for a 16:9 enclosure runs around $670 in materials — versus $1,500–$4,000+ for a pre-built enclosure kit. (Source: Golf Simulator Forum DIY build guide) For a full breakdown of what each material can and can't handle, see our PVC vs. Lumber vs. EMT frame build guide.
By the Numbers
Here's the data that should be driving every frame sizing decision you make:
- $2 billion — golf simulator market size in 2024, growing 7–9% annually, meaning more first-time DIY builders are entering the space without proper frame-sizing knowledge than ever before. (Source: Polaris Market Research / Straits Research)
- +4 inches total — minimum frame overhang beyond screen dimensions (2" per side), confirmed across multiple manufacturer sizing guidelines. Getting this wrong at the start forces the screen into constant tension at attachment points. (Source: My Golf Simulator / Shop Indoor Golf)
- 12–16 inches — required rear depth clearance between screen and wall. Below 12" and you're accelerating screen wear and creating a real bounce-back risk. (Source: Canvas ETC / Golf Simulator Forum)
- 6–8 feet max — the horizontal span limit for PVC pipe before sag starts compromising your top rail and screen tension. (Source: Canvas ETC DIY Guide)
- $670 vs. $1,500–$4,000+ — DIY EMT frame vs. pre-built enclosure kit. Getting sizing wrong on a DIY frame is especially painful because these frames are hard to resell or easily modify. (Source: Golf Simulator Forum)
Recommended Frame Size by Common Screen Size (Width, inches)
Source: My Golf Simulator / Shop Indoor Golf sizing guidelines
Common Screen Sizes vs. Recommended Frame & Depth Clearance
| Screen Size | Min Frame Size | Min Depth Behind Screen | Recommended Ceiling Height |
|---|---|---|---|
| 96" × 96" (8×8 ft) | 100" × 100" | 12 inches | 9 ft |
| 120" × 96" (10×8 ft) | 124" × 100" | 12–14 inches | 9.5 ft |
| 120" × 108" (10×9 ft) | 124" × 112" | 14–16 inches | 10 ft |
| 144" × 96" (12×8 ft) | 148" × 100" | 14–16 inches | 9.5 ft |
| 144" × 108" (12×9 ft) | 148" × 112" | 16 inches | 10 ft |
The Sizing Sequence — Do It in This Order
Follow this sequence exactly and you won't end up rebuilding anything six months from now:
- Measure usable ceiling height — floor to ceiling, minus any flooring you're adding
- Determine max screen height — ceiling height minus swing clearance (at least 12"), minus your frame's top rail thickness
- Measure room width — pick a screen width that leaves at least 2–3 feet on each side for side netting and safety clearance
- Add 4 inches total to screen width and height to get your frame dimensions (2" per side)
- Plan 12–16" of depth clearance behind the screen before you finalize where the frame sits in the room
If the numbers don't work in your space, adjust the screen size — not the rules. A 10-foot screen in an 11-foot-wide room with no side clearance isn't a simulator bay; it's a hazard. Once your frame is correctly sized, your next decision is how to actually attach the screen to it. Check out our frame attachment methods guide for the full breakdown on bungees, carabiners, and loop fasteners — it affects screen tension and longevity more than most people realize.
Get the Frame Right, Then the Screen Sings
Frame sizing isn't the exciting part of a simulator build. But it's the kind of decision you only want to make once. A screen properly tensioned in a correctly sized frame with adequate depth clearance will outperform an expensive screen crammed into a poorly built frame every single time — better image quality, longer screen life, and no surprise ricochet moments.
Ready to put a real screen into your properly-sized frame? Browse Carl's Place impact screens at GolfingSim — available in every common size so you can match your frame dimensions exactly and get to swinging.
Not sure which simulator fits your room?
The two-minute Simulator Finder Quiz checks your space and budget against every system we carry.


Keep Reading
Related guides

golf simulatorGolf Simulator Impact Screen Tear Repair: When to Patch and When to Replace

ambient light rejecting golf impact screenAmbient Light Rejecting Golf Impact Screen: Why True ALR Can’t Survive Your Driver (and What Actually Works)

chipping and puttingGolf Simulator Impact Screen for Chipping and Putting: Does Your Screen Actually Handle the Short Game?