golf sim frame build
Golf Simulator Impact Screen Frame Attachment Methods: Bungees, Carabiners, and Loop Fasteners Explained
Here's a stat most sim builders don't hear until they're already shopping for a replacement screen: a premium multi-layer impact screen attached with proper bungee tension can last five-plus years under multi-weekly driver sessions at 150–165 mph. (Source: Home Performance Lab – Best Golf Simulator Impact Screen 2026 Guide) A budget single-layer screen used at the same frequency typically needs replacement before a single season ends.
That's a massive gap. And it's not just about screen material quality — it's about how attachment method interacts with impact stress over hundreds of sessions. A well-built screen attached wrong will fail early. A decent screen attached right will outlast your expectations.
This guide breaks down every major golf simulator impact screen frame attachment method — bungees, carabiners, rope loops, and loop fastener systems — so you can match the right approach to your specific frame before you buy anything.
Why Attachment Method Is More Important Than You Think
When a ball hits your screen at 100+ mph, the screen needs to flex inward to absorb the energy. That flex is the entire design principle behind quality impact screens. If your attachment is too rigid — ratchet straps, bolted clamps, anything with no give — you're forcing all that impact energy directly into your grommets and seams instead of letting the fabric distribute it.
Grommets pull through. Seam stitching stress-cracks. Edge vinyl tears. A screen that should last years starts showing failure points in months.
Over-tensioning causes the same problem from a different angle. A screen pulled drum-tight has no flex zone — every ball strike becomes a point load on fixed attachment hardware rather than a distributed force across moving fabric. Tighter is not better. It's just faster wear.
The 4 Main Attachment Methods
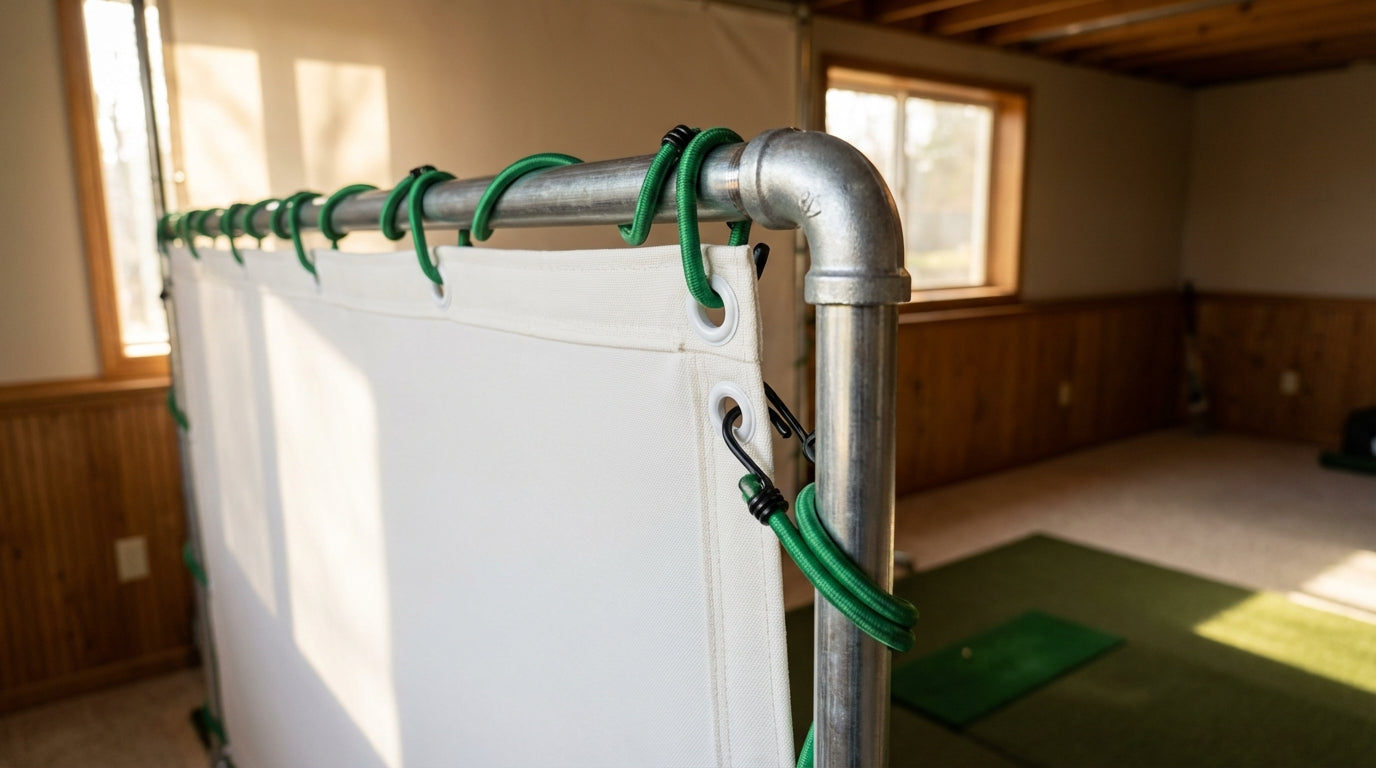
Bungee Cords — The Default, and the Best Starting Point
Bungee cords are the most common attachment method for good reason. They provide exactly what impact screens need: elastic tension that allows flex on ball strike, then snaps back to hold the screen taut. That stretch is doing real mechanical work on every driver you hit.
Standard sim bungees run 10 inches long with a 3/16-inch diameter — sized to work through standard grommet holes without excessive slack. Popular kits like SimSpace Golf ship 20 per pack, which reflects the reality that a standard 10x10 ft screen with grommets every 8 inches needs 15–20 bungees for full perimeter coverage. (Source: Golf Simulator Forum; SimSpace Golf product listing)
Critical spacing rule: one bungee every 8–12 inches around the full frame perimeter. Go wider than 12 inches and you create uneven tension pockets between grommets — spots where the screen sags and concentrates stress on the attached points. That's where premature wear starts. (Source: Canvas ETC – How To Install Hanging Golf Impact Screen)
Carabiner Clips — Best for Frequent Takedown
Carabiners make sense when you're detaching and re-attaching the screen frequently — a multi-use room, a retractable setup, or a space where the screen gets stored between sessions. The clip-and-go simplicity is real and the connection is secure.
The catch: carabiners have zero elastic give on their own. Most builders who use them pair a short bungee loop or rubber ring at each attachment point — carabiner clips to the frame, bungee loop threads through the grommet. That restores the flex that rigid carabiner-to-grommet attachment removes. Direct metal-to-grommet contact at high ball speeds accelerates wear noticeably.
Rope and Paracord Loops — Adjustable but Unforgiving
Rope loops offer maximum per-grommet adjustability — you can fine-tune tension at each point individually, which helps during initial setup when you're dialing in a flat projection surface. They're also cheap and require zero special hardware.
The tradeoff is the same as carabiners: rope doesn't stretch. Ball impact goes straight into the grommet. For casual use or lower ball speeds, rope loops work fine. For regular driver-speed sessions, bungees outlast them in terms of screen protection over time.
Loop Fastener Systems — The Clean Build Option
Loop fastener (hook-and-loop) systems are a fundamentally different approach. Instead of attaching at discrete grommet points, a continuous hook-and-loop strip runs along the full screen edge, and the screen adheres to matching hook tape mounted on your frame or foam bumpers.
This distributes tension across the entire perimeter edge rather than concentrating it at individual attachment points — which can reduce per-point stress on the screen fabric. It also produces the cleanest finished look: no exposed bungee hooks, no visible hardware, screen sits flush against the frame surface.
The tradeoff is setup complexity. You need to mount matching hook tape to your frame before the screen goes up, and initial tensioning takes longer. But for enclosure builds or setups where aesthetics and accessory flexibility matter, it's worth it. Our screen finishes guide covers when loop fastener makes sense versus Classic grommet in detail.
The 12-Inch Clearance Rule Everyone Ignores
Whatever attachment method you use: leave at least 12 inches between the back of your screen and the wall or any hard surface behind it. (Source: Canvas ETC – Golf Impact Screen Installation Guide; PlayBetter – Impact Screen Tension Guide)
That gap is your screen's flex zone. Without it, the screen hits the wall on impact — killing the flex, spiking ball rebound, and sending impact force back through your attachment hardware and into the grommets on every shot. It also creates a loud wall-thump that spreads through your house.
If your room is tight, build from that 12-inch floor and work outward. Our complete installation guide covers how to manage clearance in low-depth rooms like basements and tight garages where every inch counts.
By the Numbers: What the Data Actually Says
5+ years — documented lifespan of premium multi-layer screens (Carl's Place Premium) under regular multi-weekly use at 150–165 mph ball speeds, when attached with bungee tension that allows proper flex. Over-tensioning or rigid attachment accelerates grommet and seam wear dramatically. (Source: Home Performance Lab – Best Golf Simulator Impact Screen 2026 Guide)
< 1 season — typical replacement timeline for budget single-layer screens at the same use frequency. The material quality gap is real, but it's compounded by how attachment method interacts with impact stress over hundreds of sessions. (Source: Home Performance Lab – Best Golf Simulator Impact Screen 2026 Guide)
Every 8–12 inches — optimal bungee cord spacing for even load distribution across the full perimeter. Wider spacing creates tension pockets that accelerate edge wear at every grommet between attachment points. (Source: Canvas ETC – How To Install Hanging Golf Impact Screen)
7-inch flaps — the perimeter overhang size on Carl's Place Flap finish screens, engineered specifically to wrap a standard 1.5-inch or 2-inch steel tube frame and still leave adequate surface area for hook-and-loop foam pad attachment. (Source: Big Horn Golfer – Carl's Place Impact Screen product listings)
Estimated Screen Lifespan by Material Tier (Multi-Weekly Use, 100–115 mph Ball Speed)
Source: Home Performance Lab 2026 Impact Screen Guide; industry estimates for mid-tier
Which Screen Finish Matches Your Frame and Attachment Plan
The attachment method decision and the screen purchase decision are the same decision. Carl's Place makes three finish types — Classic, Classic with Flaps, and Classic with Loop Fastener — and each is designed for a specific frame situation and aesthetic priority.
Carl's Place Impact Screen Finish Comparison: Attachment Method & Best Use Case
Swipe to compare →
| Finish Type | Edge/Attachment System | Best Frame Type | Key Tradeoff |
|---|---|---|---|
| Classic | 2.5" vinyl edge + grommets (3/4" OD, 3/8" ID); attach via bungees, carabiners, or rope | Standard steel/EMT pipe frames with exposed tubing | Simplest setup, lowest cost; frame hardware remains visible after install |
| Classic with Flaps | Classic grommets + 7" perimeter flaps with 1" loop fastener strips | Any frame where cosmetics or safety padding matter; enclosures with foam bumpers | Cleanest look and safest build; flaps add weight and slightly complicate initial tensioning |
| Classic with Loop Fastener | Classic grommets + 1" loop fastener strips along full perimeter (no flaps) | DIY builds needing modular add-ons: side curtains, nets, retractable panels | Maximum flexibility for accessories; hook strips must be paired with matching hook tape (not included) |
If you're building your own frame and haven't locked in the material yet, our DIY frame build guide covers PVC vs. EMT vs. lumber and which plays best with each attachment method — worth reading before you buy hardware.
How to Tension Your Screen Once It's Up
Hang the screen, get all bungees through the grommets loosely, then tension gradually in a cross-pattern — add slight tension at multiple points before cranking anywhere. This keeps the screen centered on the frame as tension builds and prevents you from accidentally pulling it off-center.
Target feel: taut enough to hold a flat, sag-free projection surface. Loose enough that you can push the screen center inward a few inches by hand without fighting it hard. If the screen vibrates like a drum when you flick it, you've gone too far.
After your first few sessions, check every attachment point. Initial stretch and settling is normal — re-tension anything that's gone slack before it shifts uneven load to adjacent grommets.
Bottom Line
Your attachment method is not an afterthought. It's the variable that determines whether a quality screen lasts two years or six, and whether a budget screen fails in three months or six. Use bungees with 8–12 inch spacing for most setups. Allow 12 inches of clearance behind the screen. And match your screen finish to your frame type before you order.
Ready to pick your screen? Browse our full Carl's Place impact screen lineup here — Classic, Flap, and Loop Fastener finishes in all standard sizes, with enough detail to know exactly which one fits your build.
Not sure which simulator fits your room?
The two-minute Simulator Finder Quiz checks your space and budget against every system we carry.


Keep Reading
Related guides

golf simulatorGolf Impact Screen Max Ball Speed Rating: What Your Screen Really Survives at 110+ MPH

corner setupGolf Simulator Impact Screen for a Corner Setup: How to Angle It Without Wrecking Your Bounce-Back

golf simulatorGolf Simulator Impact Screen for a Shed: How to Size, Hang, and Tension It Right