ball containment golf simulator
Golf Simulator Side Netting Setup Guide: Build a Safe Hitting Bay That Actually Contains Your Shots
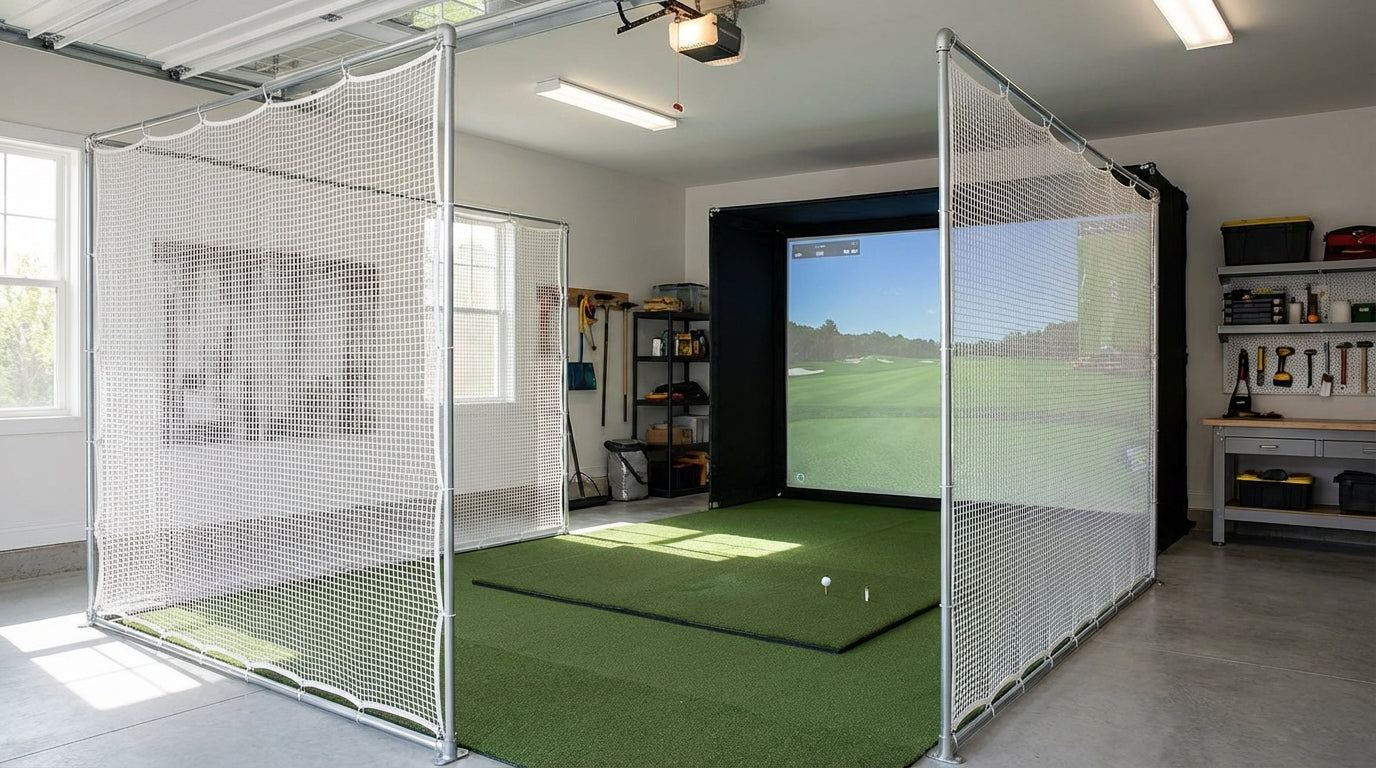
Most home simulator builders obsess over the impact screen. The projector. The launch monitor. Here's the thing nobody talks about until after it happens: a mis-hit off the toe of a driver can leave the face traveling sideways at 80+ mph. Side netting — also called golf bay baffles or side impact netting — is what keeps that ball from punching through your drywall, your TV, or whoever happens to be standing six feet to your left. The global golf simulator market is projected to reach $4.75 billion by 2035, growing at 7–9% annually. (Source: Market Research Future / Grand View Research, 2025) More homeowners are building permanent bays every year. Which means more people are about to learn the hard way why ball containment golf simulator setups require more than just a screen. This guide covers everything you need to get it right the first time.
Why Side Netting Isn't Actually Optional
Your impact screen stops the ball going straight ahead. It doesn't stop a shank, a heel miss, or a full-speed skull that leaves the face at 40 degrees off-line. In a closed bay, those balls have nowhere to go except sideways — into a wall, a window, your launch monitor cables, or someone standing in the doorway.
The broadly cited safety standard for indoor simulator bays is a minimum 7-foot clearance in all directions around the golfer. (Source: SimSpace Golf / GolfSimulatorForum community guidance) If your bay is tighter than that — or if walls, electronics, or people occupy that zone — you need active containment on the sides. Not just optimism.
Think about everything that lives along your bay perimeter: projector cords, launch monitor cables, speaker wires, a TV on the wall. One bad shot can end an expensive piece of kit. Side netting is cheap insurance compared to replacing any of that.
Measure Your Space Before You Buy Anything
Two numbers drive every netting decision: room width and the forward arc from the hitting position.
Bay Width
The minimum recommended room width for a home golf simulator is 10 feet — but 14 feet is the real target for safe swing clearance and a properly centered hitting position. (Source: SimSpace Golf / GreenPro Golf Simulators) If you're working in a 10-foot-wide space, your side netting will sit much closer to the golfer, which makes proper forward depth coverage even more critical.
Narrower rooms also generate more lateral mis-hits. The restricted setup forces swing compensations that lead to more heel and toe contact. Plan your netting for the room you actually have, not the room you wish you had.
Netting Height and Forward Depth
For height: match your ceiling clearance. Most home simulator rooms run 9–10 feet, so 8-foot-tall panels are the standard starting point. Commercial reference: SIGPRO side barrier netting panels are sized 10 ft long × 8 ft high per panel. (Source: Indoor Golf Outlet – SIGPRO)
For depth: commercial systems like SkyGuard side nets extend 4.5 feet in front of the enclosure cage. (Source: AllSportSystems – SkyGuard) That forward projection is what catches the most common lateral misses — heel and toe strikes that angle away from the screen within the first few feet of ball travel. If you're framing from scratch, matching those commercial specs gives you a proven baseline.
Already working through your frame build? Our impact screen frame DIY guide covers EMT conduit, PVC, and lumber options — the same framing approach works perfectly as a side netting attachment structure.
Choosing Your Netting Material
Two materials dominate home simulator side netting: knotless polyester and knotted nylon. The difference matters more than the price tag suggests.
Knotless Polyester (#18 Grade)
This is the most common choice for home bay side impact netting. Commercial-grade #18 knotless polyester has a breaking strength of 195 lbs and is rated for swing speeds up to 110 mph. (Source: GolfRangeNetting.com product specifications) For recreational golfers, that covers the full realistic range in a home setup.
Knotless netting is softer on ball surfaces, produces less scuffing, and holds its mesh geometry better over time. The standard 3/4-inch mesh size is correct for golf — small enough to stop a ball cleanly, large enough to let air pass through without flapping under impact. Expect to pay $1–$3 per square foot for bulk rolls.
Knotted Nylon (#21 Grade)
Step up to #21 knotted nylon if you swing above 110 mph or if your setup will see heavy daily use. It runs $1.50–$4 per square foot but handles repeated high-speed impacts with less wear over time. It's also stiffer, which makes it easier to hang taut on a frame without sagging between sessions.
DIY Frame vs. Pre-Made Panels: The Real Cost Breakdown
The build decision splits into two paths. Option one: build a simple frame from EMT conduit or PVC and hang bulk netting to fit your bay. Option two: buy pre-made panels designed to attach directly to an existing enclosure frame.
The cost gap is significant. A complete DIY enclosure build — frame, impact screen, side netting, and hardware — runs roughly $1,060 total, compared to $2,499–$3,999 for comparable pre-packaged enclosure systems. (Source: Carl's Place DIY Golf Simulator blog / AllSportSystems pricing) The side netting component alone accounts for roughly $200 of that DIY total. That's the delta that sends experienced builders sourcing netting separately — the savings fund a better launch monitor or projector instead.
Planning the full bay layout before you cut anything? Our complete spare room simulator guide walks through the full build sequence from room prep to first swing.
DIY vs. Pre-Made Golf Simulator Enclosure Cost Breakdown
Source: Carl's Place DIY Golf Simulator blog; AllSportSystems / SIG pricing 2025; industry estimates for DIY component ranges
Side Netting Options Comparison: DIY Bulk Netting vs. Pre-Made Panels
| Option | Dimensions | Approx. Cost | Frame Required | Best For |
|---|---|---|---|---|
| Bulk knotless polyester (#18, 3/4" mesh) | Custom cut to size | $1–$3 per sq ft | Yes – EMT or PVC pipe | Budget DIY builders with custom bay sizes |
| SIGPRO Side Barrier Panels | 10 ft L × 8 ft H (×2) | ~$150–$250/pair | Minimal – zip ties to existing frame | Builders who already have an enclosure frame |
| SkyGuard Top + Side Safety System | Sides: 10 ft H, 4.5 ft forward projection | ~$300–$500 system | No – mounts to existing cage uprights | Upgrading a pre-made bay for full perimeter coverage |
| SkyTrak Side Net Pair | 9.8 ft deep × 9.8 ft H triangular | Bundled with SkyTrak enclosure | No – attaches to SkyTrak enclosure poles | SkyTrak enclosure owners adding side protection |
| DIY knotted nylon (#21, 3/4" mesh) | Custom cut to size | $1.50–$4 per sq ft | Yes – requires tensioned frame | High-swing-speed users wanting maximum durability |
By the Numbers: What the Data Actually Says
Let's anchor the key decisions in real figures.
- $1,060 vs. $2,499–$3,999 — total DIY enclosure cost vs. comparable pre-made systems. Side netting accounts for roughly $200 of the DIY build total. (Source: Carl's Place DIY Golf Simulator blog / AllSportSystems)
- 7 feet in all directions — minimum safety clearance around the golfer in an indoor bay. This is the number that tells you whether netting alone is sufficient or whether you also need wall padding. (Source: SimSpace Golf / GolfSimulatorForum)
- 195 lbs breaking strength — commercial-grade #18 knotless polyester, rated to 110 mph swing speed. Know your netting's rating before you hang it — not all bulk netting sold online is golf-rated. (Source: GolfRangeNetting.com)
- 10 ft × 8 ft per panel — standard SIGPRO side barrier sizing. Use this as your reference point when estimating how much material you need for your specific bay depth. (Source: Indoor Golf Outlet – SIGPRO)
Installation Tips That Actually Matter
A netting installation that holds for years comes down to three things: tension, attachment method, and where you position the forward coverage.
Keep it taut
Loose netting catches balls but rebounds them unpredictably. Use bungee cords or snap hooks as your primary attachment — not zip ties alone. Zip ties fatigue under repeated impact and snap without warning. Run your attachment points every 12–18 inches along the frame perimeter, not just at corners.
Double your corner attachment points
Don't rely on a single connection per corner. Run the netting over the frame member and back, then secure both sections. Commercial panels use sewn border ropes for exactly this reason. Corner failures are the most common way a side netting panel fails under load.
Prioritize the forward arc
The critical containment zone is 3–5 feet in front of the hitting position, not behind it. Most lateral mis-hits that escape a bay do so in the first few feet of ball travel. That forward section needs your most secure coverage — this is where it matters most.
If your bay doubles as a living space between sessions, our multi-use room simulator setup guide has ideas for retractable netting systems that pack away cleanly when you're not hitting.
Build the Bay Right From the Start
Side netting feels optional right up until the moment it isn't. A $150–$200 investment in proper ball containment protects your walls, your gear, your launch monitor, and anyone who happens to walk into the room mid-backswing.
Get the material spec matched to your swing speed. Match the panel depth to your room width. Use a frame that won't flex on hard impact. Do those three things and you'll have a hitting bay that's genuinely safe — not just one that looks good until the first bad shot reveals the gap.
Once the containment is sorted, the next upgrade that moves the needle is the impact screen itself. Browse our full lineup of golf simulator impact screens — the right screen paired with proper side netting is what separates a real hitting bay from a corner of the garage with a net zip-tied to the wall.
Not sure which simulator fits your room?
The two-minute Simulator Finder Quiz checks your space and budget against every system we carry.


Keep Reading
Related guides

golf simulatorGolf Simulator Impact Screen Tear Repair: When to Patch and When to Replace

ambient light rejecting golf impact screenAmbient Light Rejecting Golf Impact Screen: Why True ALR Can’t Survive Your Driver (and What Actually Works)

chipping and puttingGolf Simulator Impact Screen for Chipping and Putting: Does Your Screen Actually Handle the Short Game?