golf simulator
Golf Simulator Impact Screen Seam Visibility Fix: Why It Happens and How to Actually Solve It
Here's something that catches a lot of first-time sim builders completely off guard: you spend weeks planning the setup, buy a screen that looks fine on paper, stretch it on the frame — and then fire up the projector. Image looks great for about two seconds. Then you see it. A line. Running right through the middle of your fairway.
Screen seams are one of the most common post-install complaints in the golf simulator community, and also one of the most preventable. The global home simulator market hit $1.2 billion in 2024 and is projected to reach $2.8 billion by 2033 (Source: Data Horizzon Research) — which means a constant flood of first-time DIY builders hitting this exact problem with no prior experience to draw from. This post covers why seams appear, how to check for them before you buy, and every practical fix available after install — including when replacement is honestly the smarter call.
Why Seams Appear on Golf Simulator Impact Screens
Impact screen material comes off a roll. That roll has a maximum width. Once your screen dimensions exceed that width, the manufacturer has to join two panels — and that joint is your seam.
Seamless construction is physically limited by material width. Maximum seamless height is 120" for 3-Ply HD Golf Mesh, 116" for standard HD Golf Mesh, and 111" for Sawdust Mesh. (Source: Virtual Golf Simulator) If your screen dimensions push past those numbers, you're getting a seam whether the product listing mentions it prominently or not.
The seam then becomes the weakest point under repeated ball impact. Budget impact screens typically show wear after 500–1,000 rounds — and the seam area is almost always the first failure point. Premium poly spacer screens handle 3,000–5,000 rounds before needing replacement. (Source: Canvas ETC) That gap in durability is a big part of the replacement-vs-fix calculation.
By the Numbers: What the Data Says
Understanding the material science behind seam failure helps you choose the right fix — or the right replacement.
- A tighter weave (200 TPI polyester) delivers a 25% longer lifespan versus 150 TPI of the same thickness under simulated repeated-impact testing. (Source: Canvas ETC) Loose-weave screens degrade faster at seam areas because the joint can't distribute stress evenly across the weave.
- Standard single-layer polyester screens are rated to 130–150 mph ball speeds. Premium dual-layer poly spacer screens handle 180+ mph. (Source: Canvas ETC / Indoor Golf Shop) Faster swingers put disproportionate stress on seam construction every single session.
- Replacement screens run $200–$600 by tier — budget ~$200, standard ~$250, preferred ~$400, premium ~$600. Full enclosure replacements: $800–$4,000. (Source: Golfer Logic / Shop Indoor Golf) Knowing the replacement cost upfront changes how you weigh whether a tension fix is worth the time.
- Seamless maximums: 120" for 3-Ply HD Mesh, 116" for standard HD Mesh, 111" for Sawdust Mesh. If your screen height exceeds these limits, a seam is unavoidable regardless of price tier. (Source: Virtual Golf Simulator)
Impact Screen Lifespan by Material Tier (Rounds Before Replacement)
Source: Canvas ETC durability guide; Industry estimates for 3-ply tier
Before You Buy: How to Avoid the Problem Entirely
The most effective golf simulator impact screen seam visibility fix is not buying a screen that will have a seam in your image zone. That requires knowing your exact frame dimensions before purchasing.
Match Your Dimensions to Seamless Maximums
Pull the spec sheet for any screen you're evaluating and compare its seamless maximum against your planned screen height. If you're building a 108" tall screen, both Sawdust Mesh (111" max) and standard HD Mesh (116" max) keep you seamless. If you're at 118", only 3-Ply HD Mesh (120" max) gets you there without a seam.
If your dimensions push past any seamless maximum, ask the manufacturer exactly where the seam will fall. A seam outside the projector throw area is essentially invisible during play. A seam centered in the image zone is a permanent distraction. Check our impact screen frame size guide before locking in your enclosure dimensions — getting this wrong is expensive to undo.
Weave Density Matters More Than Most Listings Admit
TPI (threads per inch) determines how well a screen distributes stress at seam areas. A 200 TPI screen at the same thickness will outlast a 150 TPI screen by roughly 25% under repeated impact. If you swing above 100 mph clubhead speed, that gap compounds significantly over time.
Post-Install Fixes: What Actually Works
The screen is already up and the seam is visible. Here's what to try — in order — before accepting it or reaching for your wallet.
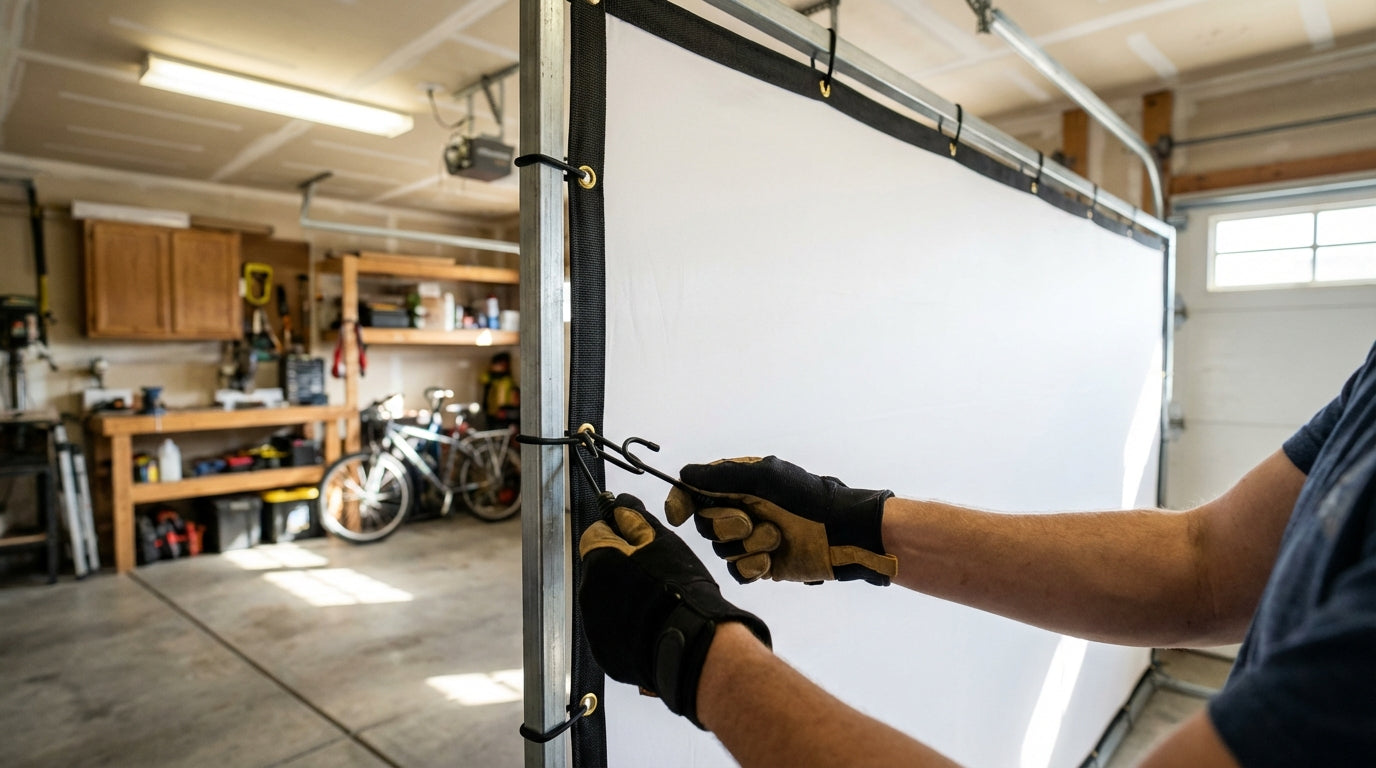
Step 1: Re-Tension from Scratch
Most visible seams on quality screens are a tension problem, not a material defect. Release all bungees or fasteners completely. Let the screen hang freely for 24 hours — this resets uneven stress patterns that built up during initial installation. Then re-attach starting from center outward at roughly 70% tension on the first pass. Final-tighten only after everything is evenly set.
Work in a cross pattern: top center, bottom center, left center, right center — then corners last. Uneven tension is the main culprit behind visible ridges at the seam. Our frame attachment methods guide covers the specific bungee placement patterns that create even tension across the full screen surface.
Step 2: Adjust Room Lighting
Seam visibility is partly a lighting problem. Direct overhead lighting at shallow angles casts shadows that make seams look dramatically worse than they are. Dim or reposition room lights so they're not raking across the screen surface at angles that exaggerate surface texture. Our LED lighting guide covers placement angles and color temperatures that won't blow out your projected image or make surface imperfections more visible.
Step 3: Reposition the Frame
If your screen has a seam that falls in the image zone and your frame position is adjustable, try shifting it so the seam lands outside the projector throw. Zero cost, completely effective when it works. Requires flexibility in your frame placement, but worth checking before spending money on anything else.
Step 4: Reinforce DIY Cut Edges
If you're working with raw material cut to size, seam visibility is often a finishing problem rather than a material one. Reinforcing cut edges with binding tape and re-grommeting evenly prevents the irregular tension that makes DIY seams show up so clearly on a projected image. Uneven grommet spacing creates scalloped tension patterns that are immediately obvious once the projector is on.
Seam Risk and Fix Options by Screen Type
Impact Screen Construction: Seam Risk & Fix Options by Type
| Screen Type | Seam Risk | Recommended Fix |
|---|---|---|
| Budget single-layer (under $250) | High — panels seamed in hitting zone | Replace with seamless screen; lighting won't hide it |
| Standard polyester seamless | Low if within size limits | Tension adjustment + 24-hr hang before tightening |
| Premium poly spacer (dual-layer) | Very low — wider seamless maximums | Bungee re-tension from center outward at 70% first pass |
| Oversized seamed (any tier) | Moderate — seam outside image zone | Reposition frame so seam falls outside projector throw |
| DIY/raw material cut-to-size | High if poorly finished | Reinforce edges with binding tape; re-grommet evenly |
When to Stop Fixing and Just Replace
Some seam problems can't be fixed — only tolerated or eliminated.
If your screen is a budget single-layer under $250 with a seam running through the primary hitting zone, no amount of tension work will make it disappear. The seam joint reflects light differently because it literally is different material at that point — the only fix is a screen that doesn't have one there.
The math often favors replacement when you run it out. A budget screen rated for 500–1,000 rounds versus a preferred-tier seamless screen rated for 4,000+ rounds is a completely different cost-per-round calculation. The cheaper option usually isn't cheaper over any reasonable time horizon. Our guide on choosing the right golf impact screen walks through exactly what the material and construction tiers mean in practice — and why screen quality affects your sim experience more than most people expect before they buy.
The Short Version
Seam visibility almost always comes down to three things: dimensions that pushed past seamless maximums, improper installation tension, or a budget screen that was never going to perform well regardless. Prevention is the real fix: measure before you buy, verify seamless maximums against your frame dimensions, and spend up if your setup pushes into seamed territory. For installed screens with tension problems, the re-tension process genuinely works. For budget screens with seams in the image zone, replacement is the honest answer — and usually the more economical one over time.
Browse our full impact screen collection — every screen is spec'd with seamless maximums so you can match your exact dimensions before purchasing and avoid this headache entirely.
Not sure which simulator fits your room?
The two-minute Simulator Finder Quiz checks your space and budget against every system we carry.


Keep Reading
Related guides

golf simulatorGolf Simulator Impact Screen Tear Repair: When to Patch and When to Replace

ambient light rejecting golf impact screenAmbient Light Rejecting Golf Impact Screen: Why True ALR Can’t Survive Your Driver (and What Actually Works)

chipping and puttingGolf Simulator Impact Screen for Chipping and Putting: Does Your Screen Actually Handle the Short Game?