frame stability
Golf Simulator Impact Screen Frame Anchoring Tips: Stop the Shift Before Your First Swing
Your impact screen can take a 220 MPH ball. Your drywall anchors almost certainly cannot. That gap — between what the screen fabric is engineered to absorb and what the fasteners holding your frame to the wall can actually hold — is where most DIY simulator builds quietly fall apart. The frame shifts a little every session. Screen wrinkles appear. Projection drifts off center. The builder spends weeks chasing symptoms instead of fixing the root cause.
If your frame is already up and any of that sounds familiar, this guide is for you. Not the build — the anchoring. The tensioning. The part that keeps everything locked, level, and dead flat after 10,000 swings.
Why the Anchor System Is the Real Weak Link
Golf impact screens are engineered to withstand ball impact speeds up to 220 MPH — meaning the screen fabric itself is overbuilt for nearly every home user. The frame anchor system is a completely different story. At those speeds, every ball strike sends a shock wave through the screen, through the grommets and bungees, into the frame, and directly into whatever is holding that frame to your wall. (Source: PlayBetter.com impact screen installation guides)
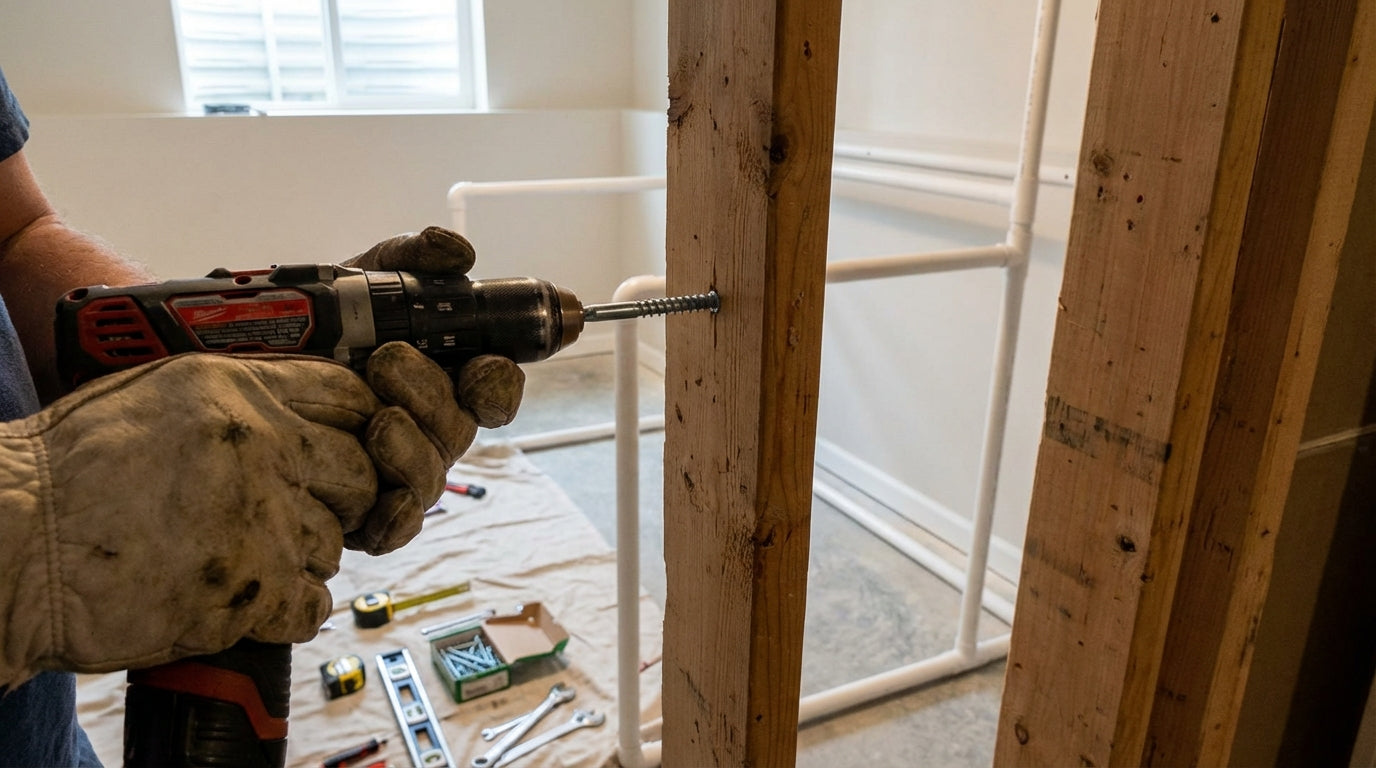
If that's a lag screw in a wood stud, you're fine. If it's a standard drywall anchor, you have a physics problem. A 1/4-inch lag screw driven into solid wood delivers over 150 lbs of shear strength per fastener. Anchor into drywall alone and that number drops under 20 lbs — a 7x+ reduction in holding capacity. (Source: AVS Forum structural fastener discussion) Frames anchored to studs stay put for years. Frames anchored only to drywall migrate, sag, and shift within weeks of regular use.
If you're still in the build phase and weighing material options, the PVC vs lumber vs EMT frame guide covers the structural trade-offs before you commit.
Wall Fastener Specs That Won't Pull Out
For permanent wall mounting, the minimum specification is 5/16" x 4" structural screws or 5/16" x 4" toggle bolts spaced every 12–16 inches. Standard drywall anchors are explicitly insufficient for impact screen loads. (Source: Canvas ETC installation guide)
Your decision tree based on wall type:
- Exposed studs (unfinished basement or garage): Lag screws directly into studs. Best-case scenario. Use 1/4" or 5/16" diameter, at least 3" length into wood.
- Finished drywall with studs behind: Find every stud, mark it, drive lag screws through drywall into stud. Don't skip studs to save time — you'll pay for it later.
- No studs in the right locations: 5/16" toggle bolts rated at 75 lbs or more each, spaced every 12". Not as strong as studs, but acceptable for most residential swing speeds.
- Concrete or masonry wall: 1/4" concrete anchors with a hammer drill. Often more reliable than wood studs if installed correctly.
Regardless of fastener type, add a horizontal 2x4 ledger board across the full mounting width of your frame. This distributes load across multiple fasteners simultaneously instead of concentrating stress on each individual anchor point. Cheap insurance against cumulative loosening.
The Flex Gap: 16 Inches or You're Doing It Wrong
A lot of builders mount the frame as close to the rear wall as possible to preserve room depth for the hitting area. Understandable instinct. Wrong call.
A minimum 12-inch gap between the back surface of the screen and the rear wall is required for safe flex absorption — 16 inches is the recommended standard for higher swing speeds. (Source: Ace Indoor Golf installation guide) When a ball hits at speed, the screen fabric needs room to flex backward. That flex is what dissipates impact energy. Eliminate the gap and all that energy transfers directly into the frame anchors and wall fasteners instead.
The downstream effects compound fast: anchors loosen under repeated vibration, the frame gradually walks forward, and you create a bounce-back hazard from balls that can't flex the screen and ricochet straight back at the hitter. If your room genuinely can't fit 16 inches, aim for 12 as a hard minimum. Under 12 and you're shortening your hardware lifespan significantly with every session.
Bungee and Grommet Spacing: Tighter Than You Probably Have It
The screen-to-frame connection is where stress concentrates if spacing is wrong. Bungee cords or zip ties should be spaced every 8–12 inches (20–30 cm) around the full perimeter. Wider than 12 inches and stress concentrates on fewer grommets, accelerating edge tearing — even grommet spacing is the single most cited factor in preventing screen tears and sagging during repeated high-velocity impacts. (Source: PlayBetter.com tension guide; Canvas ETC DIY guide)
Details that make the difference:
- Don't skip corners. Corner grommets take asymmetric loads. Add attachment points within 4 inches of every corner on top of your regular perimeter spacing.
- Match tension. Use bungees of the same length and stretch rating around the entire perimeter. Mixed bungee types create tension gradients that show up as wrinkles in the projection.
- Check every 3 months. Bungees fatigue over time. A stretched-out bungee creates slack that sags in the center of the screen. If you're dealing with persistent wrinkles, the impact screen wrinkle fix guide has a full diagnostic sequence.
For a full breakdown of hardware options — bungees vs. carabiners vs. loop fasteners — the frame attachment methods guide covers each with real pros and cons.
Floor Anchoring: The Half of This Job Nobody Talks About
Wall anchoring gets all the attention. Floor anchoring doesn't — and that's often where frame shift actually originates. If your frame has vertical posts that touch the floor, those posts need to be secured to the subfloor, not just sitting on it.
Floor flange fittings bolted into the subfloor are the right permanent approach. Don't anchor into just the surface flooring — you need subfloor contact for load transfer. For temporary setups, heavy sandbags or weighted base plates can work short-term, but they'll migrate as vibration works them loose over weeks of regular sessions.
The bottom of the screen is also worth addressing directly. If you're seeing sagging in the lower third of the projection, the screen bottom isn't tensioned — it's just hanging. Fix it with a sand-filled sleeve sewn or velcroed to the bottom edge, or a bottom tensioning bar with bungee attachment to floor anchor points.
By the Numbers: What the Data Says
Wall Fastener Holding Strength by Anchor Type (Shear Load per Fastener)
Source: Construction fastener load tables; AVS Forum lag screw discussion; Canvas ETC installation specs
- Impact screens handle ball speeds up to 220 MPH — the frame anchor system, not the screen fabric, is typically the weakest structural link in a DIY build. (Source: PlayBetter.com impact screen installation guides)
- A lag screw into a stud delivers 150+ lbs of shear strength per fastener. Anchoring into drywall alone: under 20 lbs. That's a 7x+ gap in holding capacity. (Source: AVS Forum; general construction load tables)
- Bungee or zip-tie spacing wider than 12 inches concentrates stress on individual grommets and accelerates tearing — every 8–12 inches is the correct specification. (Source: PlayBetter.com; Canvas ETC)
- 58% of all golf simulator installations globally are in the home segment — and most anchoring failures occur in home builds where installers skip floor plates or wall studs due to finished-room constraints. (Source: Fortune Business Insights, Golf Simulator Market Report 2025)
Common Impact Screen Anchoring Mistakes vs. Correct Fix
Swipe to compare →
| Anchoring Mistake | What Goes Wrong | Correct Approach |
|---|---|---|
| Anchoring into drywall only (no stud) | Fasteners pull out under repeated vibration; frame shifts mid-session | Use 5/16" lag screws into wall studs or toggle bolts rated 75+ lbs, spaced every 12–16" |
| No floor plate or bottom tension | Screen bottom lifts and sags; wrinkles appear in lower third of projection | Add floor flange fittings anchored to subfloor, or use a weighted sleeve along the screen bottom edge |
| Bungee spacing wider than 12" | Stress concentrates on fewer grommets; grommets tear within weeks of regular use | Space bungees or zip ties every 8–12" around full perimeter for even load distribution |
| Frame mounted flush to rear wall (zero gap) | No screen flex on impact; energy transfers directly to anchors; bounce-back hazard created | Maintain minimum 12" gap behind screen; 16" preferred for high-swing-speed users |
| Over-tightening one side to fix wrinkles | Creates asymmetric tension; pulls frame off plumb; causes new wrinkles on the opposite side | Adjust in small increments around the full perimeter; never tension a single side more than one step at a time |
| Sharp-cut conduit ends near screen edge | Metal burrs snag and tear screen fabric at grommets during repeated impact flex | Deburr all pipe cuts; cover grommet contact zones with foam pipe insulation or edge guard tape |
One Last Detail: Deburr Every Pipe Cut
If your frame is built from EMT conduit or PVC, check every cut end near a grommet zone. Sharp pipe burrs don't destroy your screen on the first hit — they do it on the hundredth. The failure mode is slow and localized. It always looks like normal wear until you notice the tear is always in the same spot relative to a pipe end.
Deburr every cut before install. Cover grommet contact zones with foam pipe insulation or edge guard tape. Ten minutes of work that eliminates one of the most common screen replacement scenarios in DIY builds.
Get the Foundation Right Before You Tune the Rest
A calibrated launch monitor and a dialed-in projector don't mean much if your screen is moving between sessions. Frame stability is the foundation everything else — your image quality, your shot data, your projection geometry — sits on top of. Get the anchoring right first, and all the fine-tuning becomes easier and stays put.
When you're ready to upgrade or replace the screen itself, Carl's Place impact screens are built for exactly the anchoring setup this guide describes — reinforced grommets, consistent triple-layer construction, and flex characteristics that reward proper tensioning. Browse impact screens at GolfingSim and build something that holds up for the long run.
Not sure which simulator fits your room?
The two-minute Simulator Finder Quiz checks your space and budget against every system we carry.


Keep Reading
Related guides

golf simulatorGolf Impact Screen Max Ball Speed Rating: What Your Screen Really Survives at 110+ MPH

corner setupGolf Simulator Impact Screen for a Corner Setup: How to Angle It Without Wrecking Your Bounce-Back

golf simulatorGolf Simulator Impact Screen for a Shed: How to Size, Hang, and Tension It Right